タイムトリガーでFunction ComputeからSlackに投稿する

やること

この記事ではFunction ComputeからSlackに投稿する最小のコードを紹介します。

関数、トリガーの作成

まずFunction Computeでタイムトリガーの関数を作成します。

以下のコードがFunction ComputeからSlackに現在時刻を投稿する最小の(多分)コードになります。webhook urlが分からない方ははググってください。私はいつもググってます。

const { IncomingWebhook } = require('@slack/client');

module.exports.handler = function(request, context, callback) {
  const url = 'https://hooks.slack.com/services/**********/*******************'; // YOUR_WEBHOOK_URL
  const webhook = new IncomingWebhook(url);
  const date = new Date();

  webhook.send(date.toString(), (err, res)  => {
    const message = err || res;
    callback(null, message);
  });
};

handlerの関数の引数がHTTPトリガーのものと違っていることに注意してください。私はここで結構ハマりました。

なお、ローカルでnpm installしてnode_modulesごとアップロードしなければ@slack/clientは動きません。

タイムトリガーを1分ごとに設定して動くことが確認できました。

f:id:asmsuechan:20180806143642p:plain

まとめ

タイムトリガーの「動く最小のコード」が見当たらなかったので書きました。

Function ComputeとAPI GatewayにTravis CIからデプロイする

GitHubにpushしたFunction Compute用のコードをTravis CIからfunを使ってデプロイします。

やること

Function Compute用のjsファイルをTravis CIからFunction ComputeとAPI Gatewayに自動でデプロイします。

f:id:asmsuechan:20180731173754p:plain

準備

以下を参考にしてまずローカルからfunを使ってFunction Computeにデプロイできるようになっていてください。

Function ComputeとAPI Gatewayのデプロイツールであるfunを使う - asmsuechan’s blog

.travis.ymlの追加

fun deployコマンドによって、node_modules/を含めてzipに固めてFunction Computeにデプロイしてくれます。

アクセスキー等は環境変数に入れておけばコマンド実行時に拾ってくれます。travis encryptで.travis.ymlに追加しておきましょう。

$ travis encrypt -r asmsuechan/fc_deploy_travis ACCESS_KEY_ID=xxxxxxxxxxxxxx --add
$ travis encrypt -r asmsuechan/fc_deploy_travis ACCESS_KEY_SECRET=xxxxxxxxxxxxxxxxxxxxx --add
$ travis encrypt -r asmsuechan/fc_deploy_travis ACCOUNT_ID=xxxxxxxxxxxx --add # エンドポイントの数字部分

funはnode.jsのバージョン8以上じゃないと動きません。

language: node_js
node_js:
- 8
install:
- yarn
script:
- yarn run lint
before_deploy:
- yarn add global @alicloud/fun
deploy:
  provider: script
  skip_cleanup: true
  script:
  - fun deploy
  on:
    repo: asmsuechan/fc_deploy_travis
env:
  global:
  - secure: xxxxxxxxxxxxxxxxxxxxxxxxxxxxxxxxxxxxxxxx
  - secure: xxxxxxxxxxxxxxxxxxxxxxxxxxxxxxxxxxxxxxxx
  - secure: xxxxxxxxxxxxxxxxxxxxxxxxxxxxxxxxxxxxxxxx
  - DEFAULT_REGION=cn-shanghai

REGIONじゃなくてDEFAULT_REGIONにしないとエラーが出ます。

Waiting for service fc to be deployed...
TypeError: "config.region" must be passed in
    at new Client (/home/travis/build/asmsuechan/fc_deploy_travis/node_modules/@alicloud/fc2/lib/client.js:54:13)
    at getFcClient (/home/travis/build/asmsuechan/fc_deploy_travis/node_modules/@alicloud/fun/lib/deploy/deploy-support.js:39:10)
    at <anonymous>
Script failed with status 255

OSSにTravisCIから自動アップロードする

Alibaba CloudのOSSにTravisCIから自動でアップロードします。

やること

vue-cliで作成されたVue.jsのプロジェクトを、GitHubにプッシュされたらtravisでビルド後ossutil cp dist/ oss://test-cli --recursive -i xxxxxxxxxxx -k xxxxxxxxxxxxxxx -e oss-cn-shanghai.aliyuncs.comを実行してOSSにアップロードする。

f:id:asmsuechan:20180730093141p:plain

準備

デプロイ用のRAMユーザー、OSSバケットtravisのアカウント、travisコマンド(gem install travis)、GitHubリポジトリが必要です。適当に準備しておきましょう。

参考

一度ossutilをローカルで試してみたほうが良さそうです。

asmsuechan.hatenablog.com

asmsuechan.hatenablog.com

.travis.ymlの追加

S3みたいにtravisコマンドが自動でいい感じにしてくれるわけでもtravisがproviderとして準備してくれているわけでもないのでprovider: scriptとしてゴリゴリ書く必要があります。

追加した.travis.ymlは以下のようになりました。

language: node_js
node_js:
- 7
go:
- 1.9.x
install:
- yarn
script:
- yarn run build
before_deploy:
- go get github.com/aliyun/ossutil
deploy:
  provider: script
  skip_cleanup: true
  script:
  - ossutil cp dist/ oss://test-cli --recursive -f -i $ACCESS_KEY_ID -k $ACCESS_KEY_SECRET -e oss-cn-shanghai.aliyuncs.com
env:
  global:
  - secure: qEjBMfJ5NLNN8dNDGetvi1C8/QCTOfmukY9RGCsOpMlaHUZVdFCAMBtmbuHMcRqJSyu/fBEOL2Nj1dy66EYOFWNdy6Nit7urvjn6ch0RLbdsVC/suuIZv4ROtnYRMIORvvyvtLw7C3pt19bYeKY/iGuP9UizCuu+Q2nz0yoYDWg7HT+PPuYtCwZBFUe8OhQppQNdJw4/WdLr8nAPAP0slR0gIt6Vr54KjRjLPldIuKgsQVahNNaZdgGJ6LBBJuk1C7xfywOF04VfpKzE+3DlFt8Z7e8eP69+fJ5KUl+8RRM5OOeqDdElNeUm0yfnyvUfeMlRj8U9jVja5bdIXqtIIXpngxAM9JrwPhrnh4m1+DYtsPAyk7SiOGeBkBxLJdxvcHyMepxWOgXkNl1kqY6COGWLrtrTN7ljPWxDcZcgIRPumFxddnI0qgYCB6kG4bJHpOsO0CbaqlGggFmt0S03HW2GBX+ccZK/4bCZ83teoeANuvkONVwqRfiUgdmxJtSnr1lSsklpcu90fs2lDmXmbYfgyfbtPME02/pTRSVYE1LrWSzZKDBlAmoDUfsv9Xc6J0/Q5rzSMFV73835tbAR95zvUwiCYcGWvx/c+yvzcRO7eAVQoJr4Itpm06uQGXi96NeNR9ROChM3/GNs71llV8qtuO5VW83iRfLn2JrZZbU=
  - secure: rWQ+Jen7PQBT69x0Vqu4sZqZY/PbxXFe7+gyQcSDpEFCzZPdPzPDra599G8ft4cxs6FnqXINH88gF++cW1K51o4CU6zRPEML556rPBjATtn7Dy2utoWurWU4JKZZTwTgKkCOgSG/geKRZnq7qUw5dGQIn8ULIrWfqRG5CGljzLk1WqdYgc6jI1vuZLaXcsnyIdLqv5IVKpNM6KDlLmYhZaX8U9A/YFwtCTbEHo7fBlhV2S0bAi6qnMhsWozxY6ATX5pkZtX8RQaZATku25dyNV4cvX6Y9+GLj/9zB6BWtbcbfWU/6sWVbzwpXpo/kMtWpqYsMiT9mIEzAyNPyIhdi1mGo28w/jKh7rkNGqHjdYfgouINK7VCmTbV+hJVVlT7RmWf1YwXIofl3X89QE3/H83LxrToL/ze6qEBBZ+G4rTTcEzxJqqC4rggLOOmB4OYjhaMe1i0RgLtD3jlIMAsvxLbzV9kBdeMLHPpeq8hK2ClVomt8uXT7qadR+WwqPxexl0g/+mEpdCyXPv1nvA9iHh1l5IPDQvpnE7lTlEiplMuy9E3p/Ywq3Di3Xr/yhgUJZgGalwMD/0750XQapAldg0bV1UVsZLJsl3snVZhTedYOKI4+9w/irTtk+ET04VhuCVASWuAVBztfaWF0olh0YxCLwDZsxJhbDtB7Ni/8Q0=

ちなみにossutilコマンドを実行するとき-fオプションがないとcp: overwrite "oss://test-cli/static/css/"(y or N)?で動きを止めてしまいます。

鍵情報の暗号化

travisciにはそのままGitHubで公開したくない鍵情報などを暗号化してくれる機能があります。

travis encryptコマンドが環境変数を暗号化して.travis.ymlに追加してくれます。

$ travis encrypt ACCESS_KEY_ID=xxxxxxxxxxxxxxxx --add
$ travis encrypt ACCESS_KEY_SECRET=xxxxxxxxxxxxxxxxxxxxxxx --add

まとめ

今回作成したリポジトリはこちらになります。

github.com

S3にTravisCIから自動でアップロードする

travis ciでVue.jsのプロジェクトをビルドしてdist/をS3にアップロードするようにします。

.travis.ymlの設定

.travis.ymlの設定は、travis setup s3コマンドが色々と便利にやってくれます。入れていない方はインストールしましょう。

$ gem install travis
$ travis version
1.8.8
$ travis setup s3                                                                                                        [master]
Detected repository as asmsuechan/asmsuechan.com, is this correct? |yes| yes
Access key ID: xxxxxxxxxxxxxxxxxxxx
Secret access key: ****************************************
Bucket: s3://asmsuechan.com
Local project directory to upload (Optional):
S3 upload directory (Optional): dist
S3 ACL Settings (private, public_read, public_read_write, authenticated_read, bucket_owner_read, bucket_owner_full_control): public_read
Encrypt secret access key? |yes| yes
Push only from asmsuechan/asmsuechan.com? |yes| yes

実際はこのままじゃ動かないので色々追記して以下のようになりました。

# .travis.yml
language: node_js
node_js:
  - 7
install:
- yarn
script:
- yarn run lint
- yarn run build
deploy:
  provider: s3
  skip_cleanup: true
  access_key_id: xxxxxxxxxxxxxxxxxxxx
  secret_access_key:
    secure: xxxxxxxxxxxxxxxxxxxxxxxxxxxxxxxxxxxxxx
  bucket: asmsuechan
  region: ap-northeast-1
  local_dir: dist
  acl: public_read
  on:
    repo: asmsuechan/asmsuechan.com

bucketの値にはs3://を含めていはいけないようです。

やった事

以下の3つのことをしました。

  • nodejsのバージョンを7に指定。
  • regionをap-northeast-1に指定。
  • local_dir: distを追加
  • skip_cleanup: trueを追加

それぞれちょっと詳しく書いていきます。

nodejsのバージョンを7にする

何も指定しないとnodejsのバージョンは0.10.48らしいです。これだとyarnが動かない。

Node.js version v0.10.48 does not meet requirement for yarn. Please use Node.js 4 or later.

regionをap-northeast-1にする

regionを指定しないと以下のエラーが出ます。デフォルトのregionはus-east-1らしいです。

The bucket you are attempting to access must be addressed using the specified endpoint.
Please send all future requests to this endpoint. (AWS::S3::Errors::PermanentRedirect)

skip_cleanup: trueを追加

local_dir: distを追加しても、そのままではデプロイ時にはscriptで生成されたdistディレクトリは消えてしまうようです。

出たエラーをググったらこのIssueコメント に行き着いたのでskip_cleanup: trueを追加しました。

/home/travis/.rvm/gems/ruby-2.2.7/gems/dpl-s3-1.9.8/lib/dpl/provider/s3.rb:56:in `chdir': No such file or directory @ dir_chdir - dist (Errno::ENOENT)

できたもの

私のポートフォリオサイトもどきができました。 http://asmsuechan.com/
-> https化しました。 https://asmsuechan.com

ちょっと注意

  • デプロイ専用のIAMユーザーを作りましょう
  • 403が出る方はポリシーの適用を忘れていませんか?ここなどを参考にしてみましょう

参考

S3 Deployment - Travis CI

OSSを操作するCLIツールのossutilを使う

Alibaba CloudのOSSの操作をossutilというCLIツールから行います。

ossutilのインストール

GOPATHとPATHが正しく設定されていたらgo getするだけでossutilコマンドが使えるようになります。

$ go get github.com/aliyun/ossutil
$ ossutil
Usage: ossutil [command] [args...] [options...]
Please use 'ossutil help command' to show help of command

Commands:
  mb              cloud_url [options]
        Make Bucket
  ls              [cloud_url] [options]
        List Buckets or Objects
  rm              cloud_url [options]
        Remove Bucket or Objects
  stat            cloud_url [options]
        Display meta information of bucket or objects
  set-acl         cloud_url [acl] [options]
        Set acl on bucket or objects
  set-meta        cloud_url [meta] [options]
        set metadata on already uploaded objects
  cp              src_url dest_url [options]
        Upload, Download or Copy Objects
  restore         cloud_url [options]
        Restore Frozen State Object to Read Ready Status
  create-symlink  cloud_url target_url [options]
        Create symlink of object
  read-symlink    cloud_url [options]
        Display meta information of symlink object
  sign            cloud_url [options]
        Generate download link for object

Additional Commands:
  help            [command]
        Get help about commands
  config          [options]
        Create configuration file to store credentials
  hash            file_url [options]
        Get crc64 or md5 of local file
  update          [options]
        Update ossutil

ossutilの設定

まずOSSを使うための設定をします。

$ ossutil config
The command creates a configuration file and stores credentials.

Please enter the config file path(default /Users/ryouta/.ossutilconfig, carriage return will use the default path. If you specified this option to other path, you should specify --config-file option to the path when you use other commands):(空欄のままエンターでOK)
No config file entered, will use the default config file /Users/ryouta/.ossutilconfig

For the following settings, carriage return means skip the configuration. Please try "help config" to see the meaning of the settings.

Please enter language(CH/EN, default is:EN, the configuration will go into effect after the command successfully executed):(空欄のままエンターでOK)
Please enter accessKeyID:xxxxxxxxxxxxxxxxxx
Please enter accessKeySecret:xxxxxxxxxxxxxxxxxxxxxxxxxxxxxxxxx
Please enter stsToken:(空欄のままエンターでOK)
Please enter endpoint:oss-cn-shanghai.aliyuncs.com

設定ファイルが~/.ossutilconfigに保存されます。

ちなみに設定ファイル無しでもキーをオプションとして渡す事でコマンドを実行できます。

$ ossutil ls -i xxxxxxxxxxx -k xxxxxxxxxxxxxxx -e oss-cn-shanghai.aliyuncs.com

バケットの作成

ossutil mbを使って新しくバケットを作ってossutil lsバケット一覧を確認します。

$ ossutil mb oss://test-cli
1.611435(s) elapsed
$ ossutil ls
CreationTime                                 Region    StorageClass    BucketName
2018-07-26 21:06:57 +0900 JST       oss-cn-shanghai        Standard    oss://asmsuechan-test
2018-07-27 15:11:33 +0900 JST       oss-cn-shanghai        Standard    oss://test-cli
Bucket Number is: 2
0.439196(s) elapsed

正常にバケットが作られています。

ファイルのアップロード

ファイルをアップロードするためにossutil cpを実行します。詳しい使い方を見たい方はossutil help cpでめちゃくちゃ長いヘルプを見られます。

$ ossutil cp dist/ oss://test-cli --recursive
Succeed: Total num: 14, size: 725,292. OK num: 14(upload 11 files, 3 directories).
7.206872(s) elapsed

フォルダをアップロードするには--recursiveオプションを追加します。

アップロードしたファイルを確認するために再びossutil lsを使います。

$ ossutil ls oss://test-cli
LastModifiedTime                   Size(B)  StorageClass   ETAG                                  ObjectName
2018-07-27 15:17:12 +0900 JST         8196      Standard   D8001F81BBCC687AAACA833EA66CB065      oss://test-cli/.DS_Store
2018-07-27 15:17:12 +0900 JST          512      Standard   10E49BF0460DAC5697C308A346C53A41      oss://test-cli/index.html
2018-07-27 15:17:12 +0900 JST            0      Standard   D41D8CD98F00B204E9800998ECF8427E      oss://test-cli/static/
2018-07-27 15:17:13 +0900 JST        10244      Standard   E0C9BD48FEBAC2421F2C34C85465600B      oss://test-cli/static/.DS_Store
2018-07-27 15:17:12 +0900 JST            0      Standard   D41D8CD98F00B204E9800998ECF8427E      oss://test-cli/static/css/
2018-07-27 15:17:13 +0900 JST          432      Standard   9932FCAFDD19A1DD5F429F27F849AC9F      oss://test-cli/static/css/app.30790115300ab27614ce176899523b62.css
2018-07-27 15:17:13 +0900 JST          828      Standard   8A61BB8901D198C272CA284E8B506C53      oss://test-cli/static/css/app.30790115300ab27614ce176899523b62.css.map
2018-07-27 15:17:13 +0900 JST            0      Standard   D41D8CD98F00B204E9800998ECF8427E      oss://test-cli/static/js/
2018-07-27 15:17:13 +0900 JST        11602      Standard   8DF2FAF803D14D17CF3F35629298F1DF      oss://test-cli/static/js/app.b22ce679862c47a75225.js
2018-07-27 15:17:14 +0900 JST        22225      Standard   D9512476DCD0415349BEBED038BCD723      oss://test-cli/static/js/app.b22ce679862c47a75225.js.map
2018-07-27 15:17:14 +0900 JST          857      Standard   323055C248C0CBF6E12CF4B27D6DFD9B      oss://test-cli/static/js/manifest.2ae2e69a05c33dfc65f8.js
2018-07-27 15:17:14 +0900 JST         4972      Standard   549EF9C1482F2D5944947F3D2C4B8CF1      oss://test-cli/static/js/manifest.2ae2e69a05c33dfc65f8.js.map
2018-07-27 15:17:15 +0900 JST       112107      Standard   0A693543CBAD654EF586AE02F0304905      oss://test-cli/static/js/vendor.7fed9fa7b7ba482410b7.js
2018-07-27 15:17:18 +0900 JST       553317      Standard   384C08584781091DA6A8FB3A4323AF51      oss://test-cli/static/js/vendor.7fed9fa7b7ba482410b7.js.map
Object Number is: 14
0.545218(s) elapsed

まとめ

OSSを操作するCLIツールはいくつかありますがossutilを使うのがいいみたいです。

jp.alibabacloud.com

Vue.jsのプロジェクトをOSSに静的ホスティングする

Vue.jsで作ったプロジェクトをAlibaba CloudのOSSに静的ホスティングします。

OSSバケットを作る

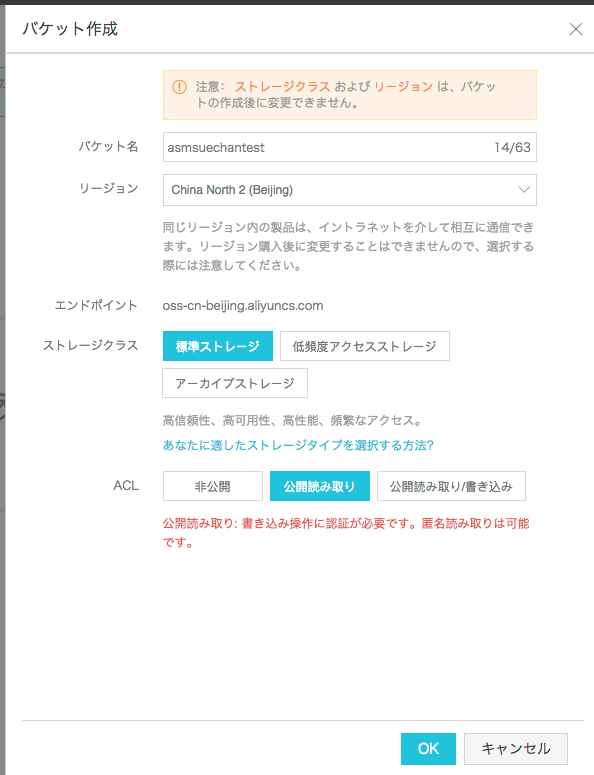
OSSを開いてバケット作成をします。ここではACLを非公開から公開読み取りにする事に注意してください。

f:id:asmsuechan:20180726221025p:plain

Vue.jsプロジェクトの作成

vue-cliを使って新しくvue.jsのプロジェクトを作成します。

$ yarn global add vue-cli
$ vue-init webpack aliyun-oss

  A newer version of vue-cli is available.

  latest:    2.9.6
  installed: 2.8.2

? Project name aliyun-oss
? Project description A Vue.js project
? Author asmsuechan <**************@gmail.com>
? Vue build standalone
? Install vue-router? Yes
? Use ESLint to lint your code? Yes
? Pick an ESLint preset Standard
? Set up unit tests Yes
? Pick a test runner jest
? Setup e2e tests with Nightwatch? Yes
? Should we run `npm install` for you after the project has been created? (recommended) yarn

   vue-cli · Generated "aliyun-oss".
(中略)
# Project initialization finished!
# ========================

To get started:

  cd aliyun-oss
  npm run dev

Documentation can be found at https://vuejs-templates.github.io/webpack
$ cd aliyun-oss
$ yarn run dev
 DONE  Compiled successfully in 9665ms

 I  Your application is running here: http://localhost:8080

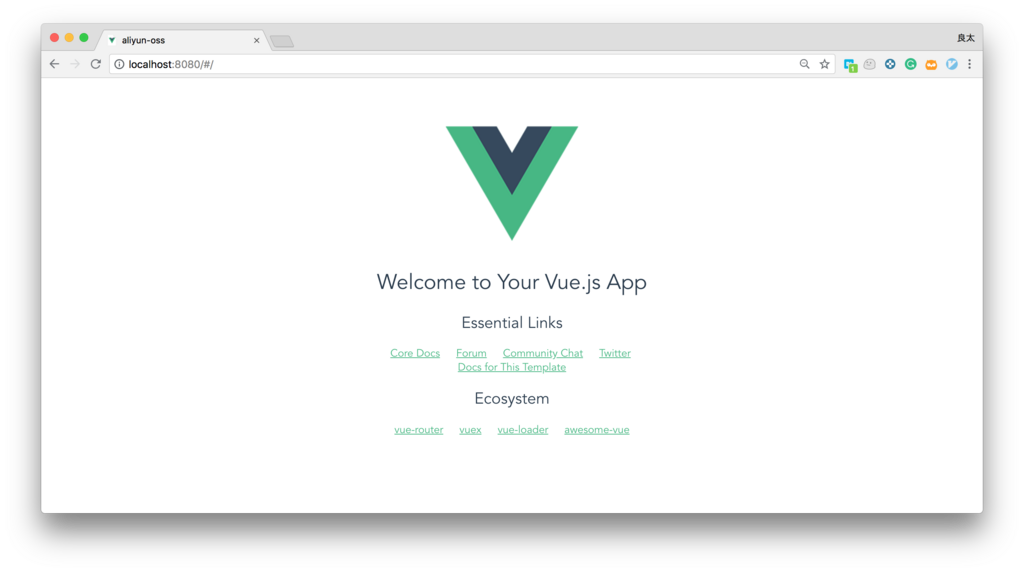
ブラウザでVue.jsプロジェクトのデフォルト画面が見えたら成功です。

f:id:asmsuechan:20180726212755p:plain

Vue.jsプロジェクトをビルドする

以下のコマンドでビルドを行います。

yarn run build
yarn run v1.5.1
(node:57892) [DEP0005] DeprecationWarning: Buffer() is deprecated due to security and usability issues. Please use the Buffer.alloc(), Buffer.allocUnsafe(), or Buffer.from() methods instead.
$ node build/build.js
Hash: 751ba1b42ec6f386f15d
Version: webpack 3.12.0
Time: 11434ms
                                                  Asset       Size  Chunks             Chunk Names
               static/js/vendor.7fed9fa7b7ba482410b7.js     112 kB       0  [emitted]  vendor
                  static/js/app.b22ce679862c47a75225.js    11.6 kB       1  [emitted]  app
             static/js/manifest.2ae2e69a05c33dfc65f8.js  857 bytes       2  [emitted]  manifest
    static/css/app.30790115300ab27614ce176899523b62.css  432 bytes       1  [emitted]  app
static/css/app.30790115300ab27614ce176899523b62.css.map  828 bytes          [emitted]
           static/js/vendor.7fed9fa7b7ba482410b7.js.map     553 kB       0  [emitted]  vendor
              static/js/app.b22ce679862c47a75225.js.map    22.2 kB       1  [emitted]  app
         static/js/manifest.2ae2e69a05c33dfc65f8.js.map    4.97 kB       2  [emitted]  manifest
                                             index.html  512 bytes          [emitted]

  Build complete.

  Tip: built files are meant to be served over an HTTP server.
  Opening index.html over file:// won't work.

✨  Done in 15.63s.
$ tree dist/
dist/
├── index.html
└── static
    ├── css
    │   ├── app.30790115300ab27614ce176899523b62.css
    │   └── app.30790115300ab27614ce176899523b62.css.map
    └── js
        ├── app.b22ce679862c47a75225.js
        ├── app.b22ce679862c47a75225.js.map
        ├── manifest.2ae2e69a05c33dfc65f8.js
        ├── manifest.2ae2e69a05c33dfc65f8.js.map
        ├── vendor.7fed9fa7b7ba482410b7.js
        └── vendor.7fed9fa7b7ba482410b7.js.map

3 directories, 9 files

OSSにアップロード

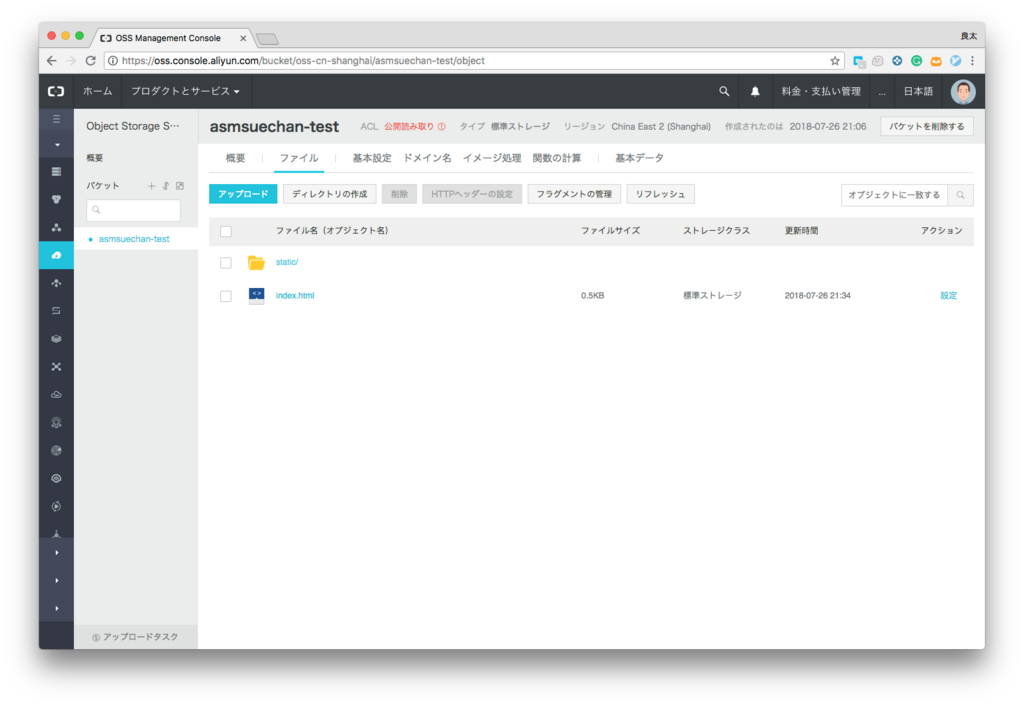
上のdist/と同じ構造になるようにアップロードします。

f:id:asmsuechan:20180726214159p:plain

アップロードしたファイルを確認する

index.htmlをクリックして出てきたプレビューのURLをコピーします。

f:id:asmsuechan:20180726215837p:plain

ここにアクセスしてローカルと同じVue.jsプロジェクトの初期画面が表示されたら成功です。

f:id:asmsuechan:20180726220302p:plain

出たエラー

AccessDeniedが出る場合は、バケットACLが非公開になっています。公開読み取りに変更してください。

f:id:asmsuechan:20180726220828p:plain

まとめ

これでSPAのフロントエンド層としてOSSを使うことができるようになります。

IoT Platformを日本版Alibaba Cloudで使う

2018年7月にAlibaba Cloud日本版に登場したIoT Platformを使いました。

ざっくり説明

IoT Platformで管理しているデバイスに対してプッシュ型の通信ができます。

IoT Platformで出来ること

IoT Platformでは現在以下のことができます。

  • バイス管理
  • MQTTでpublish/subscribe
  • ファームウェアのリモートアップデート
  • 受け取ったデータを別のサービス(Table Store/RDS/Message Service/Function Compute)に転送する

主な用途はMQTT Brokerだと思います。

プロダクトを作ってデバイスを登録する

まず、プロダクトを作ります。これはデバイスを収める箱のようなものです。

次にプロダクト画面の「デバイス」にアクセス

f:id:asmsuechan:20180721151403p:plain

次に「デバイス」->「デバイスの追加」からデバイスを追加します。

f:id:asmsuechan:20180721151539p:plain

できました。

f:id:asmsuechan:20180721151623p:plain

ProductNameProductkeyProductSecretをメモしておきます。

バイスSDKをインストールする

MQTTをsubscribe/publishするためにデバイスSDKをインストールします。

日本版ドキュメントはまだ日本語に翻訳されてない上にコード部分の改行が全部消えてて見にくいので英語版ドキュメントGitHubのReadmeを参照します。

ちなみにmacだとビルドが失敗します。Ubuntuをお使いください。

私はVagrantubuntuを立てました。

$ git clone https://github.com/aliyun/iotkit-embedded
$ cd iotkit-embedded
$ make distclean && make
SELECTED CONFIGURATION:

VENDOR :   ubuntu
MODEL  :   x86


CONFIGURE .............................. [sample]
CONFIGURE .............................. [src/cmp]
CONFIGURE .............................. [src/coap]
CONFIGURE .............................. [src/cota]

(中略)

     100.00%                    lite-log.o | log        4352 / 4352
    -----------------------------------------------------------------

     30.71%   [ dm ]           112632 Bytes
     21.52%   [ utils ]         78904 Bytes
     14.06%   [ mqtt ]          51552 Bytes
     10.49%   [ cmp ]           38472 Bytes
     5.64%    [ ota ]           20672 Bytes
     5.60%    [ shadow ]        20552 Bytes
     4.92%    [ system ]        18040 Bytes
     2.71%    [ http ]           9928 Bytes
     1.78%    [ cota ]           6512 Bytes
     1.39%    [ fota ]           5112 Bytes
     1.19%    [ log ]            4352 Bytes
=========================================================================

$ 

これでエラーなくmakeできればひとまず安心です。

makeが完了したらoutputディレクトリができて、ここにビルドされたサンプルコードの実行ファイルが配置されます。

サンプルを実行する

さて、ドキュメントではoutput/release/bin/mqtt-exampleを実行するよう書かれていますが実はこれだと日本版IoT Platformは動きません

なぜなら日本版Alibaba CloudのIoT Platformはデバイスを作成すると自動で日本リージョンに設定されてしまい、そしてmqtt-exampleの設定が上海リージョンのみの対応だからです。

ということでサンプルにあるmqtt_multi_region-exampleを実行します。

先ほどメモしたProductNameProductkeyProductSecretsample/mqtt/mqtt_multi_region-example.cの30行目くらいに書きます。

// sample/mqtt/mqtt_multi_region-example.c
/* Japan Domain */
#define PRODUCT_KEY_JP             "a1n38xxxxxx"
#define DEVICE_NAME_JP             "206rFj0AJxxxxxxxxxxxxxx"
#define DEVICE_SECRET_JP           "5ehmRxxxxxxxxxxxxxxxxxxxxxxxxxxxxxxxx"

これでビルドし直します。

$ make distclean && make

さて、これで./output/release/bin/mqtt_multi_region-exampleを実行できるのですが、まだ設定することがあります。

このmqtt_multi_region-example/a1n3xxxxxx/xxxxxxxxxxxxxx/dataというトピックにpublishするので新しくトピックを作成しておきます。

「プロダクト管理」のメッセージタブから「Topicカテゴリの作成」をします。

f:id:asmsuechan:20180721153722p:plain

Topicカテゴリの名前をdataにし、デバイス操作権限をパブリッシュとサブスクライブにしてOKを押します。

f:id:asmsuechan:20180721153751p:plain

mqtt_multi_region-exampleでリージョンを指定するには-rオプションを使います。(-hってないんだ)

$ ./output/release/bin/mqtt_multi_region-example -h
./output/release/bin/mqtt_multi_region-example: invalid option -- 'h'
usage: mqtt_multi_region-example -r [PARAMTER]
    -r sh       Select Shanghai demain.
    -r sg       Select Singapore demain.
    -r jp       Select Japan demain.
    -r us       Select America demain.
    -r ger      Select Germany demain.
$ ./output/release/bin/mqtt_multi_region-example -r jp
main|399 :: Japan Domain selected
[inf] iotx_device_info_init(40): device_info created successfully!
[dbg] iotx_device_info_set(50): start to set device info!
[dbg] iotx_device_info_set(64): device_info set successfully!
[dbg] guider_print_dev_guider_info(271): ....................................................
[dbg] guider_print_dev_guider_info(272):           ProductKey : a1n38xVIGuM
[dbg] guider_print_dev_guider_info(273):           DeviceName : 2xxxxxxxxxxxxxxxxxxxxxx
[dbg] guider_print_dev_guider_info(274):             DeviceID : xxxxxxxxxxxxxxxxxxxxxxxxxxxxxxxxxxxx
[dbg] guider_print_dev_guider_info(276): ....................................................
[dbg] guider_print_dev_guider_info(277):        PartnerID Buf : ,partner_id=example.demo.partner-id
[dbg] guider_print_dev_guider_info(278):         ModuleID Buf : ,module_id=example.demo.module-id
[dbg] guider_print_dev_guider_info(279):           Guider URL :
[dbg] guider_print_dev_guider_info(281):       Guider SecMode : 2 (TLS + Direct)
[dbg] guider_print_dev_guider_info(283):     Guider Timestamp : 2524608000000
[dbg] guider_print_dev_guider_info(284): ....................................................
(中略)
[dbg] iotx_mc_report_mid(2292): MID Report: topic name = '/sys/a1n38xVIGuM/xxxxxxxxxxxxxxxxxxxxxx/thing/status/update'
[dbg] iotx_mc_report_mid(2309): MID Report: finished, IOT_MQTT_Publish() = 0
mqtt_client|274 ::
 publish message:
 topic: /a1n38xVIGuM/xxxxxxxxxxxxxxxxxxxxxx/update
 payload: update: hello! start!
 rc = 1
[inf] iotx_mc_subscribe(1388): mqtt subscribe success,topic = /a1n38xVIGuM/xxxxxxxxxxxxxxxxxxxxxx/data!
mqtt_client|296 ::
 publish message:
 topic: /a1n38xVIGuM/xxxxxxxxxxxxxxxxxxxxxx/data
 payload: data: hello! start!
 rc = 3
[dbg] iotx_mc_cycle(1260): PUBACK
()
$ 

mqtt_multi_region-exampleは1度の実行中にSubscribeとPublishを両方行なっています。

コンソールのプロダクト詳細にあるデバイスログをみると、ちゃんと送られていることが確認できました。

f:id:asmsuechan:20180721154433p:plain

まとめ

この記事の要点

  • Linuxを使う
  • 日本版を使うときはmqtt_multi_region-exampleを使い、-rオプションを指定する
  • ちゃんとDEVICE_NAMEなどの情報を変更する
  • ドキュメントよりコードを読む

※Alibaba Cloudは開発が速いので上に書いてあるドキュメントの間違いは修正されている可能性があります。