FunctionComputeとTableStoreを連携します。
作るもの
 スマートフォンから送信された位置情報をTableStoreに保存する
POST: /locationsというエンドポイントをFunctionComputeで作ります。
エンドポイントはswaggerだとこんな感じになります。
/locations:
  post:
    summary: "Create a new Location"
    consumes:
    - "application/json"
    produces:
    - "application/json"
    parameters:
    - in: "body"
      name: "location"
      description: "Location object"
      required: true
      schema:
        properties:
          latitude:
            type: "integer"
          longitude:
            type: "integer"
    responses:
      201:
        description: "created"
      # 40xなど他のレスポンスはputRow()のエラーから取得します。
ちなみに、実際にTableStoreに保存するのは地域メッシュデータと呼ばれる、緯度経度から算出した1km四方のメッシュ番号です。緯度経度から簡単に計算できます。
準備
TableStoreにuuid: STRINGをプライマリキーとしたlocationsテーブルを作っておきます。
コンソールからポチポチするかコードから作るかしましょう。
コードから作成する場合は以下の記事が参考になります。 asmsuechan.hatenablog.com
実装
HTTPトリガーでTableStoreを叩くコードをnodejsで書いてこれをFunction Computeに乗せます。
Function ComputeとTableStoreそれぞれに関しては以下の記事が参考になると思います。 qiita.com
さてコードです。最初は送られてきた緯度経度をそのままTableStoreに保存します。
// post_location.js
const TableStore = require('tablestore')
const getRawBody = require('raw-body')
const crypto = require('crypto')

const Long = TableStore.Long;
const instanceName = 'teststorage'
const tableName = 'locations'

module.exports.handler = function(request, response, context) {
  getRawBody(request, (err, data) => {
    const uuid = crypto.randomBytes(8).toString('hex')
    const params = {
      tableName: tableName,
      condition: new TableStore.Condition(TableStore.RowExistenceExpectation.IGNORE, null),
      primaryKey: [{ 'uuid': uuid }],
      attributeColumns: [
        { 'latitude': request.queries.latitude },
        { 'longitude': request.queries.longitude },
        { 'created_at': Date.now() }
      ],
      returnContent: { returnType: TableStore.ReturnType.Primarykey }
    }

    const client = new TableStore.Client({
      accessKeyId: ’LTAxxxxxxxxxxxx’,
      secretAccessKey: ’Rztxxxxxxxxxxxxxxxxxxxx’,
      endpoint: `https://${instanceName}.cn-xxxxxx.ots.aliyuncs.com`,
      instancename: instanceName,
    })

    let status = 500
    let body = ''
    client.putRow(params, (err, data) => {
      if (err) {
        status = err.code
        body = err.message
        console.log('error:', err)
      } else {
        status = 201
        body = 'success'
        console.log('success:', data)
      }
      const respBody = new Buffer(body)
      response.setStatusCode(status)
      response.setHeader('content-type', 'application/json')
      response.send(respBody)
    })
  })
}
次にfcliから新しくサービス、関数、トリガーを作成します。
fcliがない方はGItHub Releasesから最新版をダウンロードしてください。
Releases · aliyun/fcli · GitHub
$ fcli shell
>>> mks data_collector_api
>>> ls
data_collector_api
>>> cd data_collector_api
>>> mkf post_location -h post_location.handler -t nodejs6
>>> ls
post_location
>>> cd post_location
>>> mkt post_handler -t nodejs6 -c httpTrigger.yml
httpTriggerはこんな感じにしています。ちなみにトリガーの設定ファイルはトリガー種別により違います。
# httpTrigger.yml
triggerConfig:
    authType: anonymous
    methods: ["POST"]
参考: トリガーとイベントの設定 - ユーザーガイド| Alibaba Cloud ドキュメントセンター
地域メッシュデータを保存するようにする
地域メッシュコードを計算する関数を作ってこっちを代入するように変更します。
function calc_mesh_code (latitude, longitude) {
  p = parseInt((latitude * 60 / 40))
  a = (latitude * 60) % 40
  q = parseInt((a / 5))
  b = a % 5
  r = parseInt((b * 60 / 30))
  c = (b * 60) % 30

  u = parseInt((longitude - 100))
  f = longitude - (u + 100)
  v = parseInt((f * 60 / 7.5))
  g = (f * 60) % 7.5
  w = parseInt((g * 60 / 45))
  h = (g * 60) % 45

  return parseInt(`${p}${u}${q}${v}${r}${w}`)
}
変更できたらupfで関数をアップデートします。
>>> upf -d code -h post_location.handler -t nodejs6
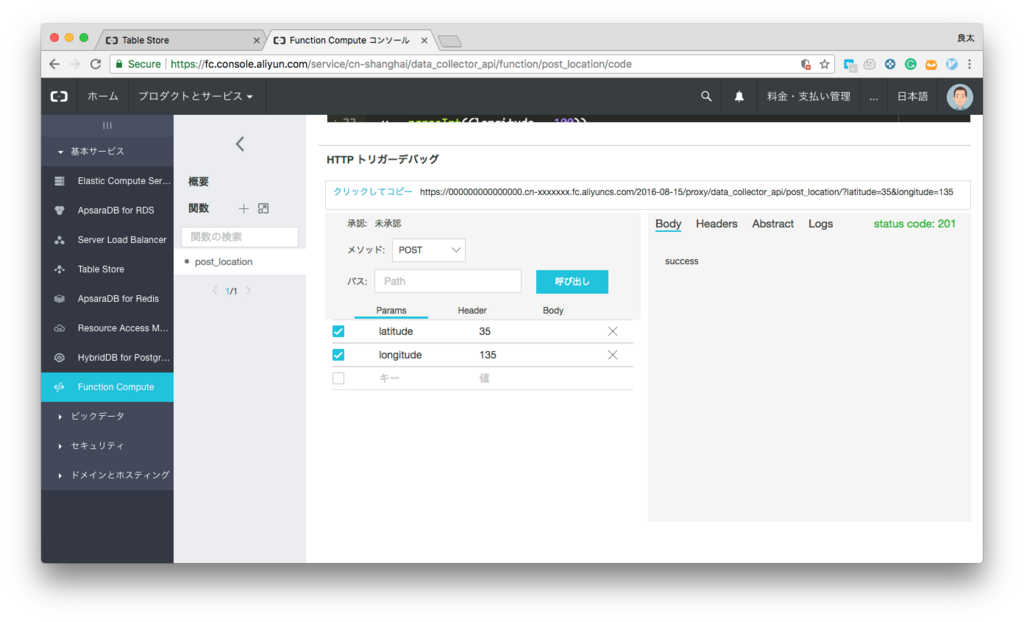
画面からサクッとテストします。latitudeとlongitudeというパラメーターを作って値を入れ、「呼び出し」を押します。

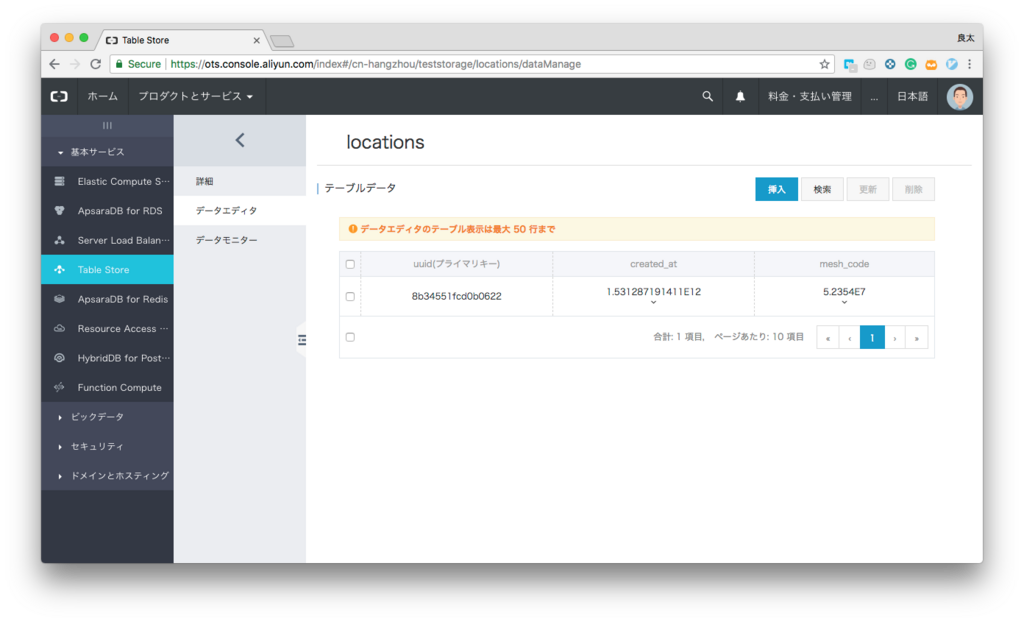
TableStoreのコンソール画面からlocationsテーブルを見てみると、ちゃんと地域メッシュコードが計算されてストアされています。

まとめ
規模が小さいAPIを作る時、HerokuなどのPaaSを使うかこんな感じでサーバレスとして実装するか少し悩みますね。