GraphQLのミューテーションを使う

GraphQLのミューテーションはリソースを変更するものです。

実行順の問題で、argsで渡された引数を元にリソースを変更することは好ましくありません。(詳しくは公式ドキュメントに任せます)

const express = require('express')
const graphqlHTTP = require('express-graphql')
const {
  graphql,
  GraphQLSchema,
  GraphQLObjectType,
  GraphQLList,
  GraphQLString,
  GraphQLInt,
  GraphQLInputObjectType,
  GraphQLNonNull
} = require('graphql');
const atob = require('atob');

const userType = new GraphQLObjectType({
    name: 'user',
    fields: () => ({
      id: { type: GraphQLInt },
      sub: { type: GraphQLString },
      created_at: { type: GraphQLString },
      updated_at: { type: GraphQLString }
    })
  })

function createUser(query) {
  console.log(query)
  return {
    id: 1,
    sub: 'auth0|aaaaaaaaaaaaaaa'
  }
}

const createUserType = new GraphQLObjectType({
  name: 'createUserType',
  fields: {
    sub: { type: new GraphQLNonNull(GraphQLString) }
  }
})

const mutation = new GraphQLObjectType({
  name: 'Mutation',
  fields: {
    createUser: {
      type: createUserType,
      args: { sub: { type: GraphQLString } },
      resolve(obj, { sub }) {
        return createUser(sub);
      }
    }
  }
})

const schema = new GraphQLSchema({
  query: new GraphQLObjectType({
    name: 'Query',
    fields: () => ({
      user: {
        type: userType,
        args: {
          sub: { type: GraphQLString }
        },
        resolve: (value, { sub }) => {
          return createUser(sub)
        }
      }
    })
  }),
  mutation: mutation
});

var app = express();
app.use('/graphql', graphqlHTTP({
  schema: schema,
  graphiql: true,
}));
app.listen(4000, () => console.log('Now browse to localhost:4000/graphql'));

以下のリクエストを投げたところ、正しく結果が返ってきたことが確認できました。ここでMとfirstは任意の名前です。

mutation M {
  first: createUser(sub: "aaaaa") {
    sub
  }
}

f:id:asmsuechan:20180902173017p:plain

GraphQLでパラメータを投げる

最近GraphQLを使っているのですがリクエストにパラメータを乗せるのに四苦八苦したのでメモしておきます。

const express = require('express')
const graphqlHTTP = require('express-graphql')
const {
  graphql,
  GraphQLSchema,
  GraphQLObjectType,
  GraphQLList,
  GraphQLString,
  GraphQLInt,
  GraphQLInputObjectType,
  GraphQLNonNull
} = require('graphql');
const atob = require('atob');

const postType = new GraphQLList(
    new GraphQLObjectType({
      name: 'post',
      fields: {
        id: { type: GraphQLInt },
        imageUrl: { type: GraphQLString },
        created_at: { type: GraphQLString },
        updated_at: { type: GraphQLString }
      }
    })
  )

function getPosts(limit) {
  return [
    { imageUrl: 'aaaaa' },
    { imageUrl: 'bbbbb' }
  ]
}

const schema = new GraphQLSchema({
  query: new GraphQLObjectType({
    name: 'Query',
    fields: () => ({
      post: {
        type: postType,
        args: {
          limit: { type: GraphQLInt }
        },
        resolve: (value, { limit }) => {
          return getPosts(limit)
        }
      }
    })
  })
});

var app = express();
app.use('/graphql', graphqlHTTP({
  schema: schema,
  graphiql: true,
}));
app.listen(4000, () => console.log('Now browse to localhost:4000/graphql'));

以下のリクエストを投げて結果を確認します。getPostsは任意の名前、postはフィールド名、limitは引数名、imageUrlはpostで返ってくるpostTypeの属性名です。

query getPosts {
  post(limit: 10) {
    imageUrl
  }
}

$ node index.jsをするとgraphiqlが見えてレスポンスを確認できます。

f:id:asmsuechan:20180902155059p:plain

コードを書くときはgraphql-jsのテストが参考になります。

https://github.com/graphql/graphql-js/blob/master/src/tests/starWarsQuery-test.js

https://github.com/graphql/graphql-js/blob/master/src/tests/starWarsSchema.js

にしてもGraphQLめちゃくちゃ取っつきにくいですね。RESTは思考停止でも書けるってことを強く感じました。

ApsaraDB for RDSへのマイグレーション

sequelizeを使ってApsaraDB for RDSにマイグレーションを流します。

ApsaraDB for RDSはちょっとお金がかかって、日本リージョンは1日120円くらいです。1ヶ月だと4000円ですね。個人利用だと地味に効いてくる値段です。

準備

準備として以下を行います。多分特に迷うところはなく画面をポチポチすれば大丈夫です。

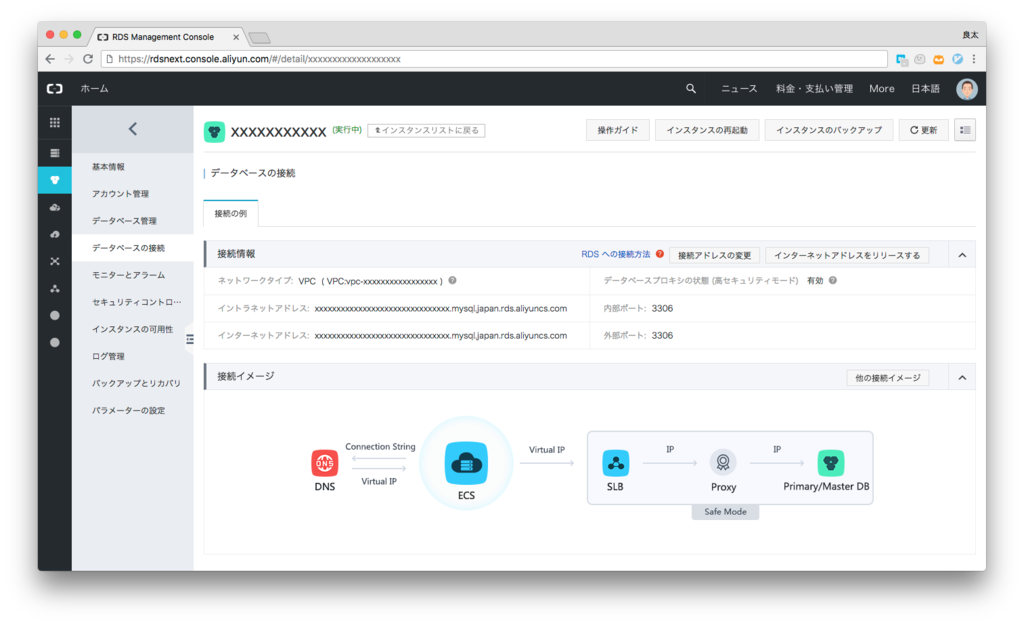
ホスト名は「データベースの接続」でインターネット接続を有効化すると表示されます。 f:id:asmsuechan:20180902100906p:plain

ホワイトリストも忘れないように設定しましょう。

マイグレーションする

DBを作成したので今度はテーブルを作成します。sequelizeマイグレーションできるようにしましょう。

$ yarn add global sequelize-cli
$ yarn add sequelize
$ yarn add mysql2
$ sequelize init

Sequelize CLI [Node: 10.6.0, CLI: 4.1.1, ORM: 4.38.0]

Created "config/config.json"
Successfully created models folder at "/Users/ryouta/src/kumonotami-migration/models".
Successfully created migrations folder at "/Users/ryouta/src/kumonotami-migration/migrations".
Successfully created seeders folder at "/Users/ryouta/src/kumonotami-migration/seeders".

config/config.jsonを編集して先ほど調べたホスト名、ユーザー名、パスワードを入力します。

{
  "development": {
    "username": "myapp_test",
    "password": "xxxxxxxxxxxxxx",
    "database": "myapp_db_test",
    "host": "xxxxxxxxxxxxx.mysql.japan.rds.aliyuncs.com",
    "dialect": "mysql"
  }
}

次に新しくテーブルを作ります。

$ sequelize model:create --underscored --name user --attributes "sub:string,deleted_at:date"

Sequelize CLI [Node: 10.6.0, CLI: 4.1.1, ORM: 4.38.0]

New model was created at /Users/ryouta/src/kumonotami-migration/models/user.js .
New migration was created at /Users/ryouta/src/kumonotami-migration/migrations/20180902014424-user.js .

これでマイグレーションファイルとモデルファイルが新規作成されます。これでよければマイグレーションを実行します。

$ sequelize db:migrate --env development

Sequelize CLI [Node: 10.6.0, CLI: 4.1.1, ORM: 4.38.0]

Loaded configuration file "config/config.json".
Using environment "development".
sequelize deprecated String based operators are now deprecated. Please use Symbol based operators for better security, read more at http://docs.sequelizejs.com/manual/tutorial/querying.html#operators node_modules/sequelize/lib/sequelize.js:242:13
== 20180902014423-create-user: migrating =======
== 20180902014423-create-user: migrated (0.087s)

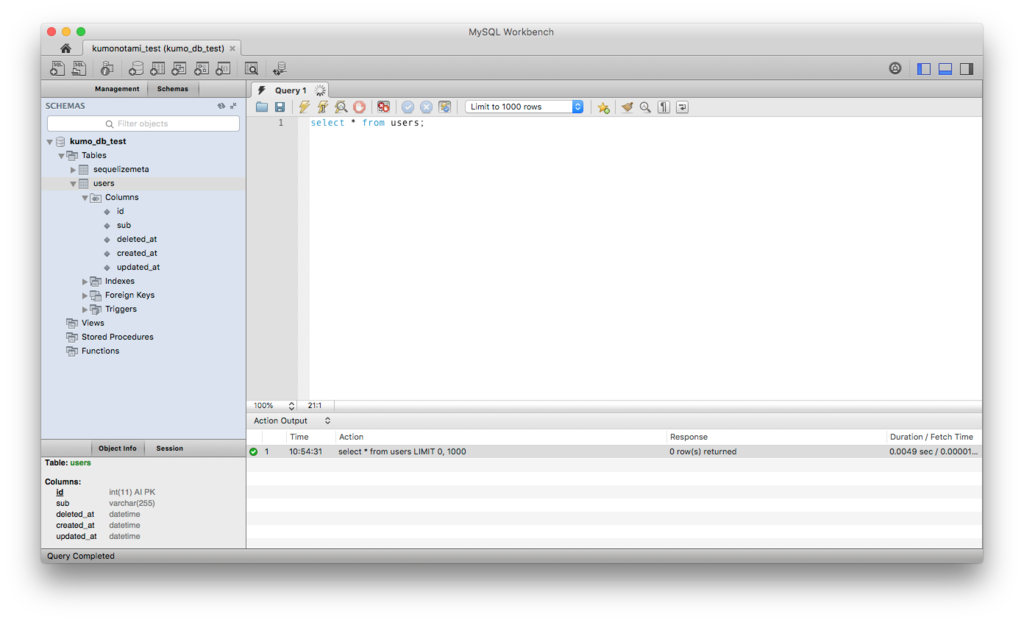
MySQL Workbenchで確認してみたところ、ちゃんと作成されていることがわかりました。 f:id:asmsuechan:20180902110414p:plain

Function Compute + API GatewayでGraphQLのAPIを作成する

アリババクラウドのFunction Compute + API Gatewayの構成のAPIでGraphQLを使います。

GraphQLとは

エンドポイントごとに機能を持たせるのではなく、一つのエンドポイントに命令をPOSTしてその結果を得るようにしたものです。

具体例だとこんな感じになります。

$ curl -H "Content-Type: application/json" -X POST -d '
{
  "query": "{ messages { name body } }"
}
' http://xxxxxxxxxxxxxxxxxx-cn-shanghai.alicloudapi.com/

{"data":{"messages":[{"body":"Hello","name":"asmsuechan"},{"body":"World","name":"suechan"}]}}

私はここを参考にしました。

www.m3tech.blog

適当におググりくだされば分かりやすい記事がたくさん出てくると思うのでGraphQLそのものの説明はそこに任せます。

最小のコード

まず、一番小さなgraphqlのコードを書いてfunction compute上で動かします。

helloというクエリを投げると{ data: { hello: "world" } }という結果が得られます。

投げるクエリ: "{ hello }"
返ってくる結果: { data: { hello: "world" } }

このサンプルは公式GitHubのものです。

// index.js
const { hook } = require('fc-helper');
const {
  graphql,
  GraphQLSchema,
  GraphQLObjectType,
  GraphQLString
} = require('graphql');

const schema = new GraphQLSchema({
  query: new GraphQLObjectType({
    name: 'RootQueryType',
    fields: {
      hello: {
        type: GraphQLString,
        resolve() {
          return 'world';
        }
      }
    }
  })
});

const query = '{ hello }';

module.exports.handler = (event, context, callback) => {
  graphql(schema, query).then((result) => {
    callback(null, { statusCode: 200, body: result });
  });
});

graphql()の実行をhandler関数の中で行うだけです。簡単です。

なお、Function Compute + API GatewayでPOSTを実装するのは少しクセがあるのでこちらを参考にしてください。

ちょっと高度なAPIにする

では少し複雑にしてみます。以下のようなクエリと結果の組み合わせを想定してコードを書きます。

投げるクエリ: "{ messages { name body } }"
返ってくる結果: {"data":{"messages":[{"body":"Hello","name":"asmsuechan"},{"body":"World","name":"suechan"}]}}

messageという型を定義して、複数のmessageが返ってくるようにします。

// index.js
const { hook } = require('fc-helper');
const {
  graphql,
  GraphQLSchema,
  GraphQLObjectType,
  GraphQLList,
  GraphQLString
} = require('graphql');
const atob = require('atob');

const messages = [
  {
    name: 'asmsuechan',
    body: 'Hello'
  },
  {
    name: 'suechan',
    body: 'World'
  }
];

const schema = new GraphQLSchema({
  query: new GraphQLObjectType({
    name: 'RootQueryType',
    fields: {
      messages: {
        type: GraphQLList(
          new GraphQLObjectType({
            name: 'message',
            fields: {
              name: { type: GraphQLString },
              body: { type: GraphQLString },
            },
          }),
        ),
        resolve() {
          return messages;
        }
      }
    }
  })
});

module.exports.handler = (event, context, callback) => {
  const request = JSON.parse(event.toString('utf8'))
  const query = JSON.parse(atob(request["body"]))["query"]
  graphql(schema, query).then((result) => {
    callback(null, { statusCode: 200, body: result });
  });
};

実際に使う場合はresolve()でデータベースから全てのメッセージを拾ってくるgetMessages()のような関数を実行します。

curlで確認すると期待する結果が得られていることが分かりますね。

$ curl -H "Content-Type: application/json" -X POST -d '
{ "query": "{ messages { name body } }"}
'http://xxxxxxxxxxxxxxxxxx-cn-shanghai.alicloudapi.com/

{"data":{"messages":[{"body":"Hello","name":"asmsuechan"},{"body":"World","name":"suechan"}]}}

まとめ

Function Compute(Faas全般で言えることです)でGraphQLを使うと、RESTと違って複数のAPI Gatewayを立てることが必要ないので簡単に複雑なAPIを作ることができて幸せになれます。

しかし正直まだ実戦投入には尚早かなと思います。

API GatewayとFunction Compute、めちゃくちゃデバッグしにくい・・・

今回のソースコードはこちらに公開しています。

github.com

Function Compute + API GatewayでPOSTのエンドポイントを作る

アリババクラウド のFunction Compute + API GatewayでPOSTのエンドポイントを作ってリクエストボディを拾うのが大変でした。

今回のソースコード

// index.js
const atob = require('atob');

const createMessage = (parameters) => {
  // データを保存するなりなんなりと
}

module.exports.handler = (event, context, callback) => {
  const query = JSON.parse(event.toString('utf8'))
  createMessage(JSON.parse(atob(query["body"])));
  callback(null, { statusCode: 201, body: 'success!' });
};

ここでポイントが2つあります。

  • fc-helperhookは使うことができない
  • リクエストボディを拾うのに手間がかかる

それぞれに関して補足します。

fc-helperhookが使えない

hookを使うときはhook(async (ctx) => {})のようなインターフェイスで使うのですが、API GatewayからFunction Computeにリクエストボディが渡らないためにctx.reqが空になってしまうので使い物になりません。

ですので(event, context, callback) => {})のスタイルを使いましょう。

fc-helper使えないならテストがめんどくさいですね・・・

改善を期待します。

リクエストボディを拾うのに手間がかかる

やたらと遠くにいて拾いにくいです。

> const request = JSON.parse(event.toString('utf8'))
{"body":"CxxxxxxxxxxxxogInxxxxxxxxxxlIGJvZHkgfSB9In0K","headers":{"X-Ca-Api-Gateway":"101CFC98-4F9C-46EF-BBDF-36D280F45D33","X-Real-IP”:”xxx.xxx.xxx.xxx”,”X-Forwarded-Proto":"http","X-Forwarded-For":"xxx.xxx.xxx.xxx","User-Agent":"curl/7.54.0","Content-Type":"application/json","Accept":"*/*","CA-Host":"10ba8f4b3ea74xxxxxx0e5c4-cn-shanghai.alicloudapi.com"},"httpMethod":"POST","isBase64Encoded":true,"path":"/","pathParameters":{},"queryParameters":{}}
> atob(request["body"])
CxxxxxxxxxxxxogInxxxxxxxxxxlIGJvZHkgfSB9In0K

さらに注意

本題とはあまり関係ありませんが、callbackの引数に気をつけましょう。第二引数のオブジェクトのstatusCodebodyは必須です。

API GatewayのmethodをPOSTにするのを忘れないようにしましょう。template.ymlを使いまわしてGETのままで少し詰まりました。

Function Computeの自動テスト

Function Computeに対するテストはfc-helpertestを使って行います。

ここではアクセスがあったらhello world!\nというbodyと200のステータスを返すエンドポイントを想定します。

// index.js
const { hook } = require('fc-helper');

exports.handler = hook(async (ctx) => {
  ctx.body = 'hello world!\n';
});

このコードに対するテストコードは以下のようになります。

// test/index.test.js
const assert = require('assert');
const { test } = require('fc-helper');
const index = require('../index.js')

describe('hello world', () => {
  it('should return correct response', async () => {
    const res = await test(index.handler).run('{}', '{}');
    assert.equal(res.statusCode, 200, 'status code')
    assert.equal(res.body, 'hello world!\n', 'http body')
  });
});

めちゃくちゃ便利ですね。

serverless frameworkを使ってFunction ComputeとAPI Gatewayにデプロイする

serverlessを使う

github.com

serverlessはlambdaなどの各サービスの上へ簡単にサーバレスなアプリケーションを作成/デプロイできるCLIツールです。ロゴがカッコいいですね。

serverlessのプラグインとしてアリババクラウドが出しているserverless-aliyun-function-computeがあるのでこれを使います。

まずyarn global add serverlessでserverlessをインストールしておきましょう。

aliyun-nodejsのインストール

$ serverless install --url https://github.com/aliyun/serverless-function-compute-examples/tree/master/aliyun-nodejs
Serverless: Downloading and installing "aliyun-nodejs"...
Serverless: Successfully installed "aliyun-nodejs"
$ ls -lah aliyun-nodejs
total 32
drwxr-xr-x  6 ryouta  staff   192B Aug  7  2018 .
drwxr-xr-x  3 ryouta  staff    96B Aug  7  2018 ..
-rw-r--r--  1 ryouta  staff    86B Aug  7  2018 .gitignore
-rw-r--r--  1 ryouta  staff   191B Aug  7  2018 index.js
-rw-r--r--  1 ryouta  staff   322B Aug  7  2018 package.json
-rw-r--r--  1 ryouta  staff   712B Aug  7  2018 serverless.yml
$ serverless plugin install --name serverless-aliyun-function-compute
Serverless: Installing plugin "serverless-aliyun-function-compute@latest" (this might take a few seconds...)
Serverless: Successfully installed "serverless-aliyun-function-compute@latest"

credentialの設定をする

アリババクラウド、各サービスがそれぞれで秘密情報の場所とフォーマットを設定しているから同じ内容のファイルがバラけて気持ち悪い。

デフォルトのファイルの場所は~/.aliyuncli/credentialsです。変更も可能です。

$ mkdir ~/.aliyuncli
$ vim ~/.aliyuncli/credentials
$ cat ~/.aliyuncli/credentials
[default]
aliyun_access_key_id = xxxxxxxxxxxxxxx
aliyun_access_key_secret = xxxxxxxxxxxxxxxxxxx
aliyun_account_id = xxxxxxxxxxxxxxx

deployを実行する。

$ serverless deploy
Serverless: Packaging service...
Serverless: Excluding development dependencies...
Serverless: Compiling function "hello"...
Serverless: Finished Packaging.
Serverless: Log project sls-xxxxxxxx-logs already exists.
Serverless: Log store sls-xxxxxxxxxx-logs/aliyun-nodejs-dev already exists.
Serverless: Log store sls-xxxxxxxxxx-logs/aliyun-nodejs-dev already has an index.
Serverless: RAM role sls-aliyun-nodejs-dev-exec-role exists.
Serverless: RAM policy fc-aliyun-nodejs-dev-access exists.
Serverless: RAM policy fc-aliyun-nodejs-dev-access has been attached to sls-aliyun-nodejs-dev-exec-role.
Serverless: Service aliyun-nodejs-dev already exists.
Serverless: Bucket sls-xxxxxxxxxxx already exists.
Serverless: Uploading serverless/aliyun-nodejs/dev/xxxxxxxxxxx-2018-08-07T04:01:01.158Z/aliyun-nodejs.zip to OSS bucket sls-xxxxxxxxxxxxx...
Serverless: Uploaded serverless/aliyun-nodejs/dev/xxxxxxxxxxxx-2018-08-07T04:01:01.158Z/aliyun-nodejs.zip to OSS bucket sls-xxxxxxxxxxxxx
Serverless: Updating function aliyun-nodejs-dev-hello...
Serverless: Updated function aliyun-nodejs-dev-hello
Serverless: RAM role sls-aliyun-nodejs-dev-invoke-role exists.
Serverless: Attaching RAM policy AliyunFCInvocationAccess to sls-aliyun-nodejs-dev-invoke-role...
Serverless: Attached RAM policy AliyunFCInvocationAccess to sls-aliyun-nodejs-dev-invoke-role
Serverless: Creating API group aliyun_nodejs_dev_api...
Serverless: Created API group aliyun_nodejs_dev_api
Serverless: Creating API sls_http_aliyun_nodejs_dev_hello...
Serverless: Created API sls_http_aliyun_nodejs_dev_hello
Serverless: Deploying API sls_http_aliyun_nodejs_dev_hello...
Serverless: Deployed API sls_http_aliyun_nodejs_dev_hello
Serverless: GET http://xxxxxxxxxxxxxxxxxxxxxxxxxxxxxxxxxxx-cn-shanghai.alicloudapi.com/foo -> aliyun-nodejs-dev.aliyun-nodejs-dev-hello
$ 
$ serverless invoke -f hello
Serverless: Invoking aliyun-nodejs-dev-hello of aliyun-nodejs-dev
Serverless: {"statusCode":200,"body":"{\"message\":\"Hello!\"}"}

serverless invokeに渡す必要がある-fオプションは、jsファイル中のhandler関数の名前です。(ここではhello)

出たエラー

serverless deployを実行した時に以下の2つのエラーが発生しましたが、ログを見ると特にリソース自体は作成されていたので何もせずdeployを再実行しました。私は3回目で正常に成功しましたw

きっとプラグイン側のバグでしょう。

POST /services failed with 400. requestid: 5a98e7ee-8159-cc22-0d5a-18bec02a9cc8, message: project 'sls-5326127221743842-logs' does not exist.

The role not exists:sls-aliyun-nodejs-dev-invoke-role

確認

コンソールで確認して見ると、Function ComputeとAPI Gatewayにリソースが作られていました。

f:id:asmsuechan:20180807130720p:plain

f:id:asmsuechan:20180807130742p:plain

funserverlessどちらを使うべきか

上記のように謎に失敗する時があることや鍵の指定方法を考えると、funがいいと思います。公式なので変更にも強そうです。

funだとタイムトリガーなど他のトリガーにも対応できますし。

asmsuechan.hatenablog.com